A home theater platform transforms how people experience movies and entertainment at home. Unlike standard floor-level seating, a properly built platform creates tiered viewing angles that eliminate sight-line issues and deliver that authentic theater feel. Whether retrofitting a basement, bonus room, or dedicated media space, building a platform isn’t just cosmetic, it’s functional infrastructure that improves viewing comfort and adds real value to a home theater setup. This guide walks through platform types, construction steps, and design considerations to help DIYers build a stable, code-compliant structure that’ll support seating and viewers for decades.
Table of Contents
ToggleKey Takeaways
- A home theater platform raises rear seating by 6–12 inches to eliminate sight-line issues and deliver unobstructed viewing angles for all viewers.
- Home theater platform construction requires basic framing skills, standard tools, and proper leveling, making it a weekend DIY project for intermediate builders.
- Raised platforms can conceal cables, wiring, and HVAC conduit underneath the deck, keeping your theater space clean and organized while supporting stadium-style seating.
- Ceiling height, riser elevation, and load distribution are critical design considerations—aim for at least 7 feet of clearance above seated viewers’ heads and verify local building codes for permit requirements.
- Floating platforms with hidden support structures and LED edge lighting offer modern aesthetics for contemporary home theaters, though they require more precise engineering and cantilever calculations.
- Carpet remains the best finish flooring for home theater platforms because it absorbs sound, provides comfort, and effectively hides wiring access points.
What Is a Home Theater Platform and Why You Need One
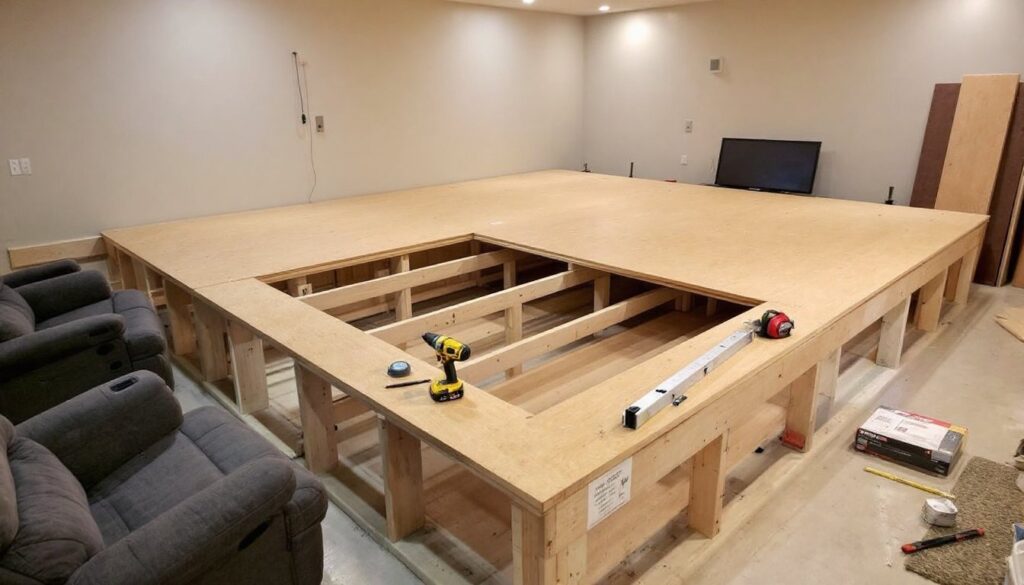
A home theater platform is an elevated floor structure built to raise seating in the back rows of a viewing space. It’s essentially a framed deck inside a room, designed to create stadium-style seating tiers.
The primary benefit is sightline improvement. In a typical room with flat flooring, anyone sitting behind the front row ends up staring at heads instead of the screen. A platform raises the rear seating by 6 to 12 inches (or more, depending on ceiling height and row count), allowing unobstructed viewing angles for everyone.
Beyond visibility, platforms add structural function. They can conceal subwoofer cables, power runs, and HDMI lines beneath the deck, keeping the room clean. Some builders integrate bass shakers or tactile transducers into the platform frame, turning the structure itself into a resonance chamber for low-frequency effects.
Platforms also define zones. In multi-use spaces, a raised platform visually and physically separates the theater area from the rest of the room, adding a sense of intentional design that flat floors can’t match.
Building a platform does require basic framing skills, access to standard carpentry tools, and attention to load-bearing math. But the construction is straightforward, similar to building a low deck or storage platform, and well within reach for intermediate DIYers who can measure twice and cut once.
Types of Home Theater Platforms for Your Space
Raised Platforms for Tiered Seating
Raised platforms are the workhorse option for most home theaters. They consist of a 2×6, 2×8, or 2×10 dimensional lumber frame, topped with ¾-inch plywood or OSB sheathing, then finished with carpet, vinyl, or engineered flooring.
Typical heights range from 6 to 12 inches for single-tier setups, though multi-tier platforms can step up 8 to 10 inches per level. Height depends on ceiling clearance (don’t forget to account for seat back height), row spacing, and screen position.
These platforms rest directly on the subfloor and are either floating (not fastened to walls) or anchored to studs with structural screws or brackets. Floating designs allow for easier removal or modification: anchored platforms provide maximum stability and are better when dealing with heavy recliners or multiple rows.
Raised platforms are ideal for basements, dedicated theater rooms, and spaces where ceiling height allows for at least 7 feet of clearance above the seated viewer’s head. They’re also the best choice when running wiring, HVAC, or low-voltage conduit underneath the deck.
Floating Platforms for Modern Aesthetics
Floating platforms create a cantilevered or visually lightweight appearance by concealing support structure or using minimal visible framing. These aren’t literally floating, they still need joists and blocking, but the design hides traditional leg posts or perimeter skirts.
One approach uses a perimeter ledger board fastened to wall studs, with joists cantilevered inward. The platform appears to hover, with shadow gaps along the edges. LED strip lighting installed in these gaps enhances the effect and provides ambient lighting during movies.
Another method involves steel tube supports or adjustable furniture levelers set back from the platform edge, hidden by a decorative fascia. This works well in modern or industrial-themed spaces where clean lines and minimal bulk are priorities.
Floating platforms require more precise engineering. Cantilevers need proper joist sizing and spacing to prevent bounce or deflection, especially with heavy seating. Consult local building codes or an engineer if cantilevering more than 24 inches or supporting theater recliners that exceed 300 pounds per seat when occupied.
These platforms shine in contemporary home theaters with integrated smart home technology like app-controlled lighting, motorized shades, and wireless audio zones. The aesthetic pairs well with minimalist decor and dedicated media rooms that double as showpiece spaces.
How to Build a Home Theater Platform: Step-by-Step Guide
Materials list:
- 2×6 or 2×8 dimensional lumber (pressure-treated if on concrete, standard SPF if on wood subfloor)
- ¾-inch plywood or Advantech subfloor panels
- 3-inch deck screws or structural screws
- Construction adhesive (PL Premium or equivalent)
- Carpet padding and carpet, or underlayment and finish flooring
- Shims, joist hangers (if needed), and metal corner braces
Tool list:
- Circular saw or miter saw
- Drill/driver with bits
- 4-foot level
- Tape measure and framing square
- Chalk line
- Safety glasses, hearing protection, dust mask
Step 1: Measure and Plan the Layout
Determine platform dimensions based on seating width and depth. Standard home theater recliners are 38 to 42 inches wide: plan at least 24 inches of depth per row, more if using recliners that extend. Sketch the platform footprint on the floor with painter’s tape or chalk.
Check the subfloor for level. Slopes greater than ¼ inch over 8 feet need shimming or leveling compound. Unlevel platforms cause seating to rock and create tripping hazards.
Step 2: Frame the Perimeter and Joists
Cut perimeter rim joists to length and fasten them together with 3-inch screws to form a rectangle. For platforms wider than 4 feet, install interior joists on 16-inch centers running perpendicular to the seating rows. Use joist hangers at rim connections for added strength.
If building on concrete, use pressure-treated lumber for any wood touching the slab. On wood subfloors, standard framing lumber works fine. Fasten the frame to the subfloor with construction screws or masonry anchors (for concrete) every 24 inches.
Step 3: Level and Shim the Frame
Place a 4-foot level across joists in multiple directions. Shim low spots with composite shims (they won’t compress like wood). This step is critical, skip it and the platform will feel unstable even if it’s structurally sound.
For tall platforms (10+ inches), add blocking between joists at mid-span to prevent lateral twist and reduce flex.
Step 4: Install the Deck
Cut ¾-inch plywood to fit the platform, staggering seams so they don’t align. Run a bead of construction adhesive along the top of each joist, then screw down the plywood every 8 inches along joists and 6 inches along edges. This glue-and-screw method eliminates squeaks.
Leave a ⅛-inch gap between plywood sheets to allow for expansion.
Step 5: Add Finish Flooring
Carpet is the most popular finish for home theaters, it absorbs sound, feels comfortable underfoot, and hides wiring access hatches. Install carpet padding first, then stretch and tack carpet over the deck.
For a modern look, use luxury vinyl plank (LVP) or engineered hardwood over an underlayment with acoustic backing. Avoid ceramic tile, it’s hard, cold, and reflects sound.
Step 6: Install Fascia and Trim
Cover the platform edges with ¾-inch MDF, primed pine, or stained hardwood to match the room’s baseboard. Paint or stain before installation. This step turns a utilitarian structure into finished furniture.
If adding LED tape lighting, route a channel in the back of the fascia board and run low-voltage wiring before final installation.
Safety note: Wear safety glasses when cutting, hearing protection when using power saws, and a dust mask when sanding or cutting treated lumber. Pressure-treated lumber contains preservatives that shouldn’t be inhaled.
Permit check: Most jurisdictions don’t require permits for non-structural platforms under 30 inches tall that don’t involve electrical or plumbing work. But, rules vary, confirm with local building departments before starting. If the platform will support more than 50 pounds per square foot (heavy recliners, multiple people), or if fastening to load-bearing walls, a permit and inspection may be required.
Design Considerations for Maximum Comfort and Function
Ceiling height: Measure from the top of the platform to the ceiling, then subtract seat height and the seated viewer’s eye level (typically 42 to 48 inches for recliners). Aim for at least 7 feet of clearance above the viewer’s head to avoid a claustrophobic feel.
Riser height: A single-tier platform usually sits 8 to 12 inches tall. Multi-tier designs step up 8 to 10 inches per level. Risers taller than 12 inches may feel awkward and create tripping hazards, especially in dark theaters. If ceiling height is tight, keep the platform at 6 inches and angle the screen downward slightly.
Access and egress: If the platform runs wall-to-wall, leave at least one side open or install a 36-inch-wide aisle for safe entry and exit. Building codes typically require egress paths in habitable spaces, and a walled-in platform can become a code violation or safety risk.
Wiring and cable management: Drill access holes in the deck before installing carpet. Route HDMI, speaker wire, power, and subwoofer cables through conduit or split loom tubing to keep them organized and protected. Label everything. Install a hinged access panel in the decking near equipment connections for future upgrades.
Sound isolation: While platforms don’t require soundproofing, adding a layer of mass-loaded vinyl (MLV) or dense rubber underlayment between the joists and decking can reduce sound transmission to rooms below. This is especially useful in multi-story homes where the theater sits above bedrooms or living spaces.
Load distribution: Standard 2×6 joists on 16-inch centers support typical residential loads (40 psf live load) without issue. But, home theater equipment like large recliners, multiple rows of seating, or built-in subwoofers can push weight beyond typical assumptions. For heavy-duty setups, upgrade to 2×8 or 2×10 joists or reduce spacing to 12 inches on center.
Vibration and bass response: Some builders deliberately isolate the platform from walls and subfloor using rubber pads or dense foam at contact points, reducing vibration transfer. Others do the opposite, mechanically coupling the platform to the floor to extend bass response. The right choice depends on whether the goal is isolation (for neighbors or family) or immersion (for tactile effects).
Lighting: Recessed LED step lights or rope lighting along platform edges improve safety in dark rooms and add visual polish. Low-voltage 12V systems are DIY-friendly and don’t require an electrician in most jurisdictions. Dim, warm-toned lights (2700K) won’t interfere with screen viewing.
Future flexibility: If the theater might change, adding rows, swapping seating, or relocating equipment, build the platform as a floating structure without permanent wall anchors. Modular designs can be disassembled or adjusted later with minimal damage to the room. Reviews from home technology buying guides often emphasize the importance of planning for future upgrades in dedicated AV spaces.
Conclusion
Building a home theater platform is a high-impact project that dramatically improves viewing comfort and room aesthetics. With basic framing skills, the right materials, and attention to leveling and load distribution, DIYers can create a professional-grade structure in a weekend. Focus on solid construction, clean cable management, and thoughtful design, this platform will anchor the theater for years.