Setting up a home theater used to mean drilling holes through walls, fishing speaker wire behind drywall, and hoping you got the angles right. Not anymore. Wireless speakers have matured from convenience gadgets into legitimate high-fidelity components that can deliver immersive surround sound without the cable mess. Whether you’re retrofitting an existing room or building a media space from scratch, wireless technology offers flexibility that wired systems can’t match, especially in rooms where running cables would mean tearing into finished walls or crossing doorways. This guide walks through what actually matters when choosing and installing wireless home theater speakers in 2026.
Table of Contents
ToggleKey Takeaways
- Wireless home theater speakers eliminate the need for wall drilling and cable routing, making them ideal for finished rooms, open-concept spaces, and situations where cable installation would be impractical or costly.
- Modern 5GHz Wi-Fi and proprietary RF protocols deliver 24-bit/48kHz audio with latency under 30 milliseconds, far superior to Bluetooth and imperceptible during movie playback.
- Choose between soundbars with wireless subwoofers for simplicity or full surround systems with discrete channels—room size, budget, and existing equipment should guide your decision.
- Expect to invest $300–$700 for soundbar setups or $600–$1,200 for competent 5.1 wireless systems, with proper room calibration and speaker placement delivering optimal performance.
- Wireless surrounds still require AC power outlets and can experience interference from crowded RF bands, so plan outlet locations carefully and test speaker placement before permanent installation.
- Room acoustics trump technology—add rugs, curtains, and acoustic panels to hard surfaces to reduce echoes and improve audio quality beyond any gear upgrade.
Why Wireless Speakers Are Perfect for Home Theater Systems
Wireless speakers solve the single biggest obstacle in home theater installation: cable routing. If your media room has finished drywall, hardwood floors, or an open-concept layout, pulling speaker wire to rear surround positions means either surface-mounting conduit (visible and awkward) or cutting into walls and patching afterward. Wireless rear channels eliminate that entirely.
Modern wireless protocols, primarily 5GHz Wi-Fi and proprietary RF systems, offer bandwidth sufficient for 24-bit/48kHz audio with latency under 30 milliseconds, which is imperceptible during movie playback. That’s a dramatic improvement over Bluetooth, which still compresses audio and introduces noticeable sync lag on most A/V receivers.
Another practical advantage: flexibility in speaker placement. Wired systems lock you into fixed positions unless you’re willing to re-run cables. Wireless speakers can be repositioned during furniture rearrangements without requiring any wall work. This matters more than most people expect, room acoustics change with couch placement, and being able to tweak speaker angles without rewiring is a real asset.
One honest limitation: wireless speakers still need power outlets. They’re cable-free for audio, but each unit requires AC power. Plan outlet locations accordingly, and budget for surge protectors if wall outlets are limited. If your room lacks outlets near ideal speaker positions, you’ll need an electrician to add them, usually a straightforward job in modern construction but more involved in older homes with lath-and-plaster walls.
Types of Wireless Home Theater Speakers
Soundbars with Wireless Subwoofers
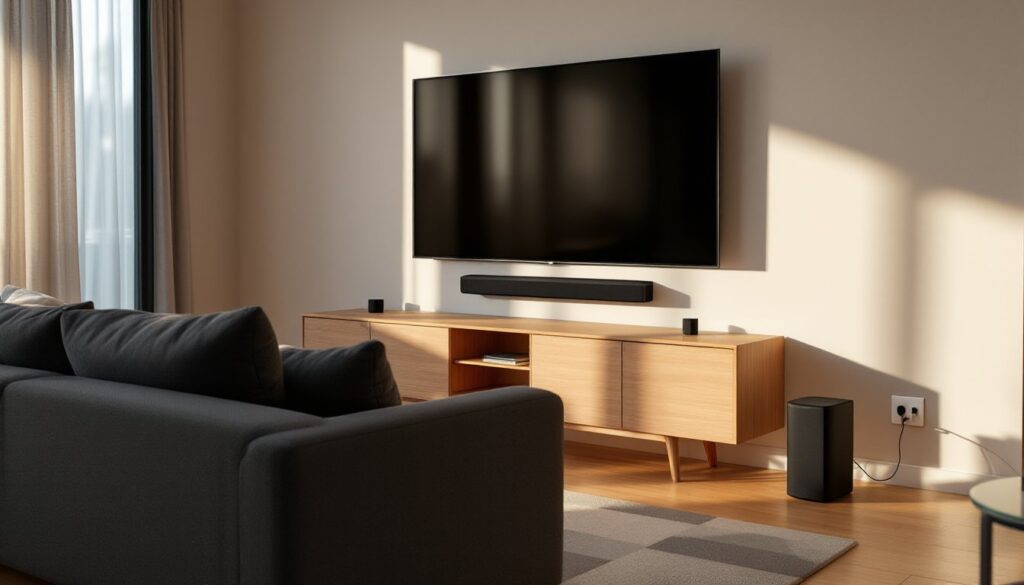
Soundbars remain the simplest entry point for wireless home theater audio. A typical setup includes a horizontal bar that sits below or mounts above the TV, paired with a wireless subwoofer that handles low-frequency effects (LFE) below 80Hz. The subwoofer connects via a dedicated RF transmitter built into the soundbar, not Bluetooth.
Most mid-range soundbars ($400–$800) include virtual surround processing, Dolby Atmos or DTS:X decoding that simulates height and rear channels using psychoacoustic tricks. It’s not true discrete surround, but in rooms under 200 square feet, the effect is convincing enough for casual viewing.
Higher-end models add detachable wireless satellite speakers for actual rear surround channels. These typically ship with charging bases or require AC power. Setup is plug-and-play: the satellites pair automatically with the soundbar on first power-up.
Soundbars work best in apartments, condos, or living rooms where a full receiver-and-speaker rig isn’t practical. They won’t match the imaging of discrete speakers, but they’re vastly better than TV speakers and require zero calibration.
Full Wireless Surround Sound Systems
If you want genuine multi-channel audio, discrete left, center, right, surround left, surround right, and LFE, you need either a wireless-enabled A/V receiver or a dedicated wireless speaker ecosystem.
Wireless-enabled receivers use proprietary transmitter kits (like Yamaha’s MusicCast or Denon’s HEOS Wireless) to send audio to battery-powered or AC-powered rear speakers. The front three channels (LCR) typically remain wired because they handle dialogue and most directional effects: only surrounds go wireless. This hybrid approach balances performance with convenience.
Ecosystem-based systems (Sonos, Bose, high-end models featured by Digital Trends) use Wi-Fi for all speaker communication. Setup happens through a smartphone app, and the system auto-calibrates using the phone’s microphone to measure room acoustics. These systems integrate well with streaming services and voice assistants, but they’re usually closed ecosystems, you can’t mix brands or add third-party components.
Both approaches support Dolby Atmos and DTS:X if the source receiver or processor decodes it. Just verify your TV passes through these formats via eARC (enhanced Audio Return Channel) on HDMI. Older TVs with standard ARC max out at Dolby Digital Plus.
How to Choose the Right Wireless Speakers for Your Space
Start with room size and layout. In spaces under 150 square feet, a soundbar with wireless sub covers most use cases. Between 150–300 square feet, consider a 5.1 wireless system. Over 300 square feet or in rooms with vaulted ceilings, you’ll want more power and possibly add height channels (5.1.2 or 7.1.2 configurations).
Measure your room dimensions before shopping. Multiply length × width × height to get cubic footage. Speakers are rated for power output (watts RMS), but what matters more is sensitivity (measured in dB SPL at 1 meter). A speaker rated 88 dB sensitivity needs half the amplifier power of an 85 dB model to produce the same volume. For rooms over 250 square feet, look for surrounds with sensitivity above 87 dB.
Check your existing gear. If you already own an A/V receiver, verify it supports wireless speaker kits from the same manufacturer. Mixing brands (e.g., Yamaha receiver with Sonos speakers) usually doesn’t work, proprietary protocols aren’t cross-compatible.
Budget realistically. Expect $600–$1,200 for a competent 5.1 wireless system, or $300–$700 for a soundbar-plus-surrounds kit. Luxury options like Marantz’s new wireless speakers push well beyond $10,000, but diminishing returns kick in hard above $2,000 for most residential spaces.
Consider codec support. Dolby Atmos and DTS:X are standard on 2026 gear, but older systems may only handle Dolby Digital 5.1. If you stream via apps (Netflix, Disney+), verify the speaker system supports the codecs those platforms use. Most streaming Atmos content is Dolby Digital Plus with Atmos metadata, not lossless TrueHD.
Setting Up Your Wireless Home Theater System: A DIY Guide
Tools and materials:
- Laser level or smartphone level app
- Stud finder (if wall-mounting)
- Drill/driver with assorted bits
- #8 x 2-inch wood screws (for mounting into studs)
- Drywall anchors rated for 30 lbs (if mounting between studs)
- Surge protector with at least six outlets
- Cable ties or Velcro straps
Safety note: Wear safety glasses when drilling overhead. If mounting above 7 feet, use a stable stepladder with a platform tray.
Step-by-step:
-
Plan speaker placement. Front left and right speakers should flank the TV at ear height when seated, angled 22–30 degrees inward. Center channel goes directly above or below the screen. Surrounds sit 90–110 degrees off-axis from the main seating position, 1–2 feet above ear level.
-
Locate studs for wall mounts. Standard wall studs sit on 16-inch centers in most modern framing. Mark stud locations with painter’s tape. If your ideal speaker position lands between studs, use toggle bolts or heavy-duty drywall anchors rated for the speaker’s weight plus 50% margin.
-
Run power to surround positions. If outlets aren’t nearby, use flat extension cords designed to run under baseboards or along door frames. Avoid running cords under rugs (fire hazard). If adding new outlets, hire a licensed electrician, this work requires permits in most jurisdictions and must meet NEC Article 210 for branch circuits.
-
Mount brackets using the laser level to ensure they’re plumb. Drill pilot holes slightly smaller than screw diameter (5/32-inch for #8 screws) to prevent splitting. Attach brackets with screws driven into studs, not just drywall.
-
Power on and pair speakers per manufacturer instructions. Most systems enter pairing mode automatically on first power-up. If using a receiver with a wireless kit, connect the transmitter to the receiver’s surround pre-outs.
-
Run room calibration. Systems with auto-calibration (Audyssey, YPAO, Dirac Live) use a microphone placed at the main listening position. Follow the on-screen prompts, this usually takes 5–10 minutes and measures speaker distances, levels, and frequency response.
-
Test with reference content. Play a Dolby Atmos demo or a movie with active surround mix (action films work well). Listen for smooth panning between channels and verify the subwoofer isn’t boomy or disconnected from the mains.
If walls are concrete, brick, or metal-framed, expect potential interference with wireless signals. Test speaker placement before final mounting, play audio and walk the perimeter to check for dropouts.
Overcoming Common Wireless Speaker Challenges
Dropouts and interference: Wireless speakers operate on crowded RF bands. If you experience audio cutting out, check for nearby devices on 5GHz Wi-Fi, routers, baby monitors, cordless phones. Most routers auto-select channels: log into yours and manually set it to a channel at least three steps away from the speaker system’s frequency (check the manual for specifics). Thick walls with metal studs or radiant barrier sheathing can block signals. In these cases, reposition the base transmitter closer to the surrounds or use a wireless repeater if the manufacturer offers one.
Latency: Audio lag between video and sound is rare with modern wireless systems, but if you notice it, enable AV Sync or Lip Sync adjustment in your receiver or TV settings. Most systems allow +/– 200 milliseconds of correction. Some smart home guides from CNET cover additional troubleshooting for streaming devices that introduce their own delay.
Battery life (portable surrounds): If your system uses rechargeable wireless surrounds, expect 8–12 hours per charge. Keep charging cables accessible behind furniture. After a year of use, lithium-ion batteries degrade: plan to replace or switch to AC-powered surrounds if runtime drops noticeably.
Firmware updates: Manufacturers push updates to fix bugs and add codec support. Connect the system to your home network and enable auto-updates if available. Skipping updates can cause compatibility issues with newer streaming apps or game consoles.
Room acoustics: Wireless tech doesn’t fix poor room acoustics. Hard surfaces (tile, hardwood, bare drywall) create echoes. Add area rugs, curtains, or fabric-wrapped acoustic panels on primary reflection points (side walls at speaker height). Bass traps in corners tame subwoofer boom. These aren’t electrical issues, they’re physics, but they affect perceived audio quality more than any gear upgrade.